Following are the steps to add work location in PW:
Step 1: Navigate through (PW Admin >> Nurture and Manage>> See all)
Step
2: Select Cities, click on
![]() and fill the necessary details.
and fill the necessary details.
Step
3: Click on 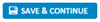 .
.
Following are the steps to add work location in PW:
Step 1: Navigate through (PW Admin >> Nurture and Manage>> See all)
Step
2: Select Cities, click on
![]() and fill the necessary details.
and fill the necessary details.
Step
3: Click on .
2. How to map the leave applicability for an employee?
Following are the steps to map the leave applicability:
Step 1: Navigate through (PW Admin >> See all>> Leave Admin)
Step 2: (Select Applicability>> Select Leave Type).
Step
3: Click on ![]() and fill the necessary fields.
and fill the necessary fields.
Step
4: Click on  .
.

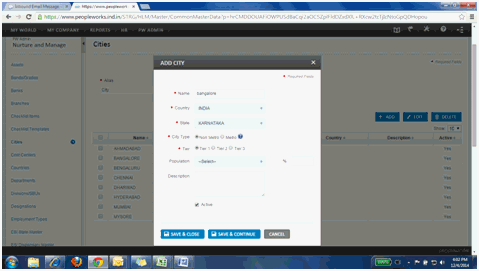
3. How can I add new bands to PW?
Following are the steps to add bands to PW:
Step 1: Navigate through (PW Admin >> See all)
Step
2: Select Band, click on ![]() and fill the necessary fields.
and fill the necessary fields.
Step
3: Click on  .
.
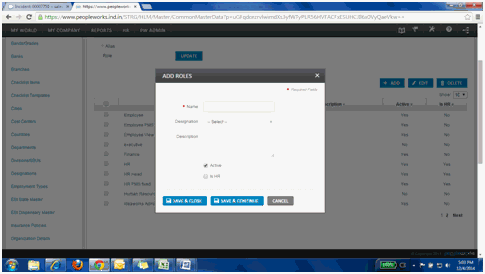
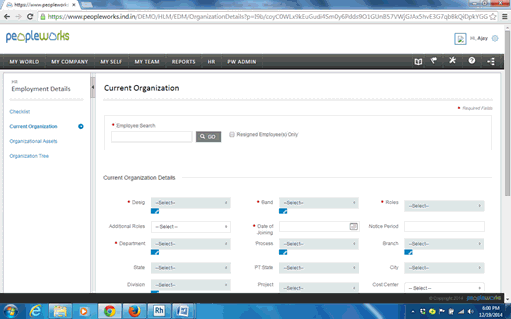
4. How can I add new role to PW?
Below are the steps to change the role of employees:
Step 1: Navigate through (HR>> Employment details>> Current Organization)
Step 2: Search for employee and change the role in the drop down available in the field Role.
Step
3: Click on  .
.
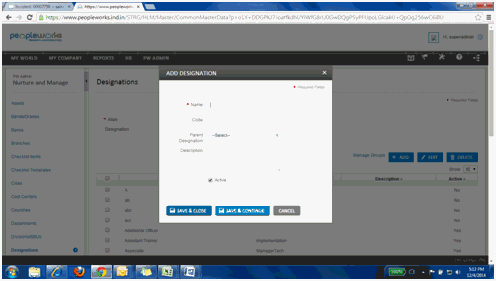
5. How can I add new designation?
Following are the steps to add new designation:
Step 1: Navigate through (PW Admin >> Nurture and Manage)
Step
2: Select Designations, click
on ![]() and fill the necessary fields.
and fill the necessary fields.
Step 3: Select the parent designation as the employee reporting Officer.
Step
4: Click on  .
.
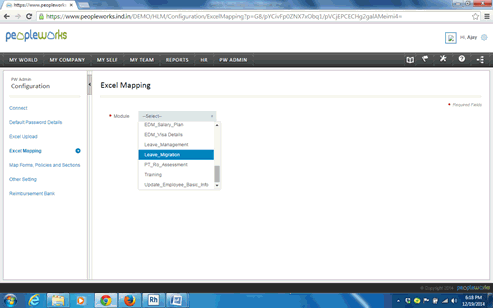
Below are the steps to update the leave details:
Step 1: Navigate through (PW Admin>> See all>> General Configuration>>Excel Mapping)
Step 2: Select Leave Migration from the Module dropdown and click on Download.
Step 3: Fill in all the fields in the downloaded template.
Employee ID: for whom the leave has to be updated.
Leave Type: Type of leave to be applied (should be same as that defined in the Leave Admin>> Leave Type)
Posted Date: Date of posting the application (Current date)
From date and To date: Date for which the leave is to be taken.
From session and To session: This has to be selected depending on the number of leaves taken.
If the
leave taken is half a day, select both sessions as
Either 1 (if the leave is for first half) or 2 (if the
leave is availed for second half)
If the
leave is taken for 1 day, select
From session as 1 and To session as 2.
Number of days: Enter the number of days leave taken.
Reason for leave/cancellation: Mark the reason
Reporting Officer ID: Enter the RO's ID.
Status:
Select
the status as Applied if you just want to apply the leave.
(Requires only 1 row for this transaction)
Select
the status as Approved if you want to apply and approve
the leave.
(Requires 2 records, one for applied state and one for
approved state for this transaction)
Step 4: Save the updated file.
Step 5: Navigate through (PW Admin>> General Configuration>> Excel Upload).
Step 6: Select Leave Migration from the Modules and choose the saved file to be uploaded.
Step
7: Click on  .
.
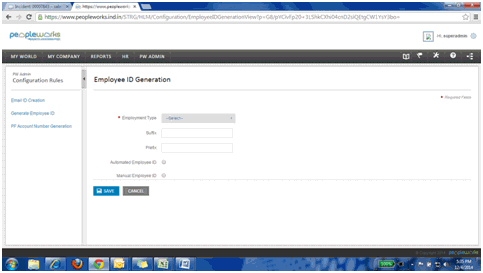
7. Can I configure rules to generate the Employee Id automatically?
Following are the steps to configure rules to generate Emp Id automatically:
Step 1: Navigate through (PW Admin >> See all>> Configuration Rules).
Step 2: (Select Generate Employee ID >> Select Employee Type).
Step 3: Fill the necessary details and check the Automated Employee ID.
Step
4: Click on  .
.
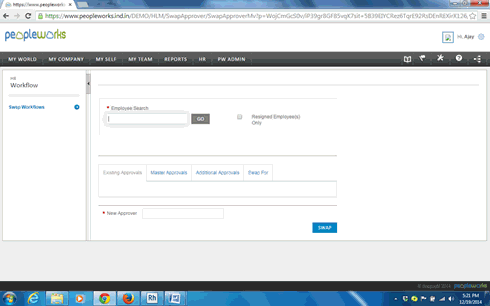
8. How can I change the approvers for the modules?
Below are the steps to change the approvers for the modules:
Step 1: Navigate through (HR>> See all>> Swap Workflows)
Step 2: Search for the employee whose repartees requests needs to be approved.
Step 3: The pending requests in that particular employees' queue will appear in the Existing approvals.
Step 4: Check the request of module to be swapped and enter the new approvers' name in the New Approver field.
Step
5: Click on  .
.
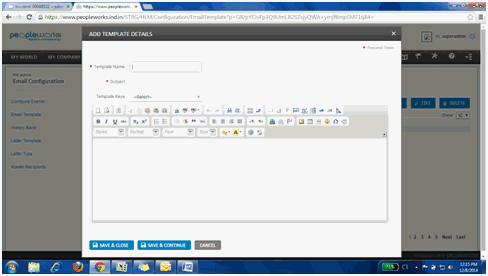
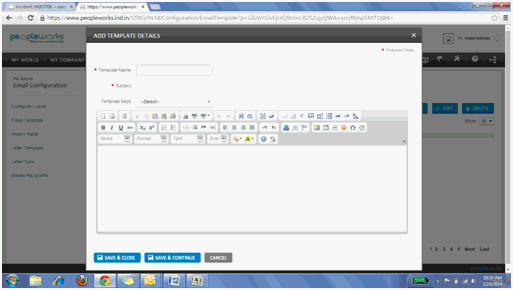
9. How to add Email Templates in PW?
Following are the steps to add the email templates:
Step 1: Navigate through (PW Admin >> See all>> Email Configuration)
Step
2: Select Email Template,
click on ![]() and fill the necessary fields.
and fill the necessary fields.
Step
3: Click on .
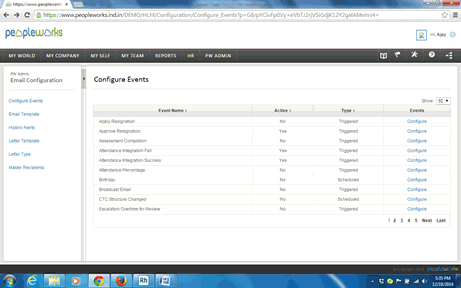
10. How to add additional recipients for all email templates?
Below are the steps to add recipients:
Step 1: Navigate through (PW Admin>> See all>> Email Configuration>> Configure events)
Step 2: Click on Configure, for the email template that needs additional recipient.
Step 3: Select the template name and edit.
Step 4: Add the recipient in the To or CC field as required.
Step
5: Click on  .
.
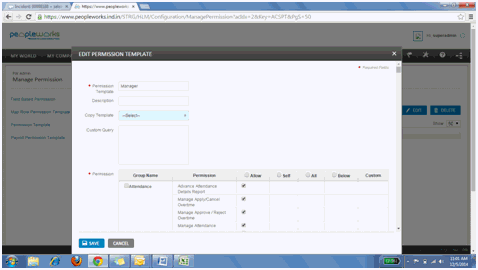
11. How can I give permission for a particular role?
Following are the steps:
Step 1: Navigate through (PW Admin >> See all)
Step 2: Click on Manage Permission.
Step 3: Select Permission Template>> Select manager.
Step
4: Click on  and check the necessary boxes (Allow,
self, all, below, custom)
and check the necessary boxes (Allow,
self, all, below, custom)
Step
5: Click on  .
.
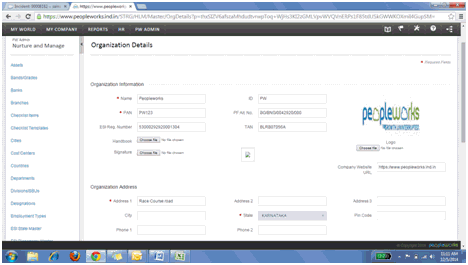
12. How can I add logo and company's URL in organization details page?
Following are the steps to add logo and company's URL:
Step 1: Navigate through (PW Admin >> Nurture and manage>> See all)
Step
2: Select Organization details,
click on ![]() and fill the necessary fields.
and fill the necessary fields.
Step
3: Click on  .
.
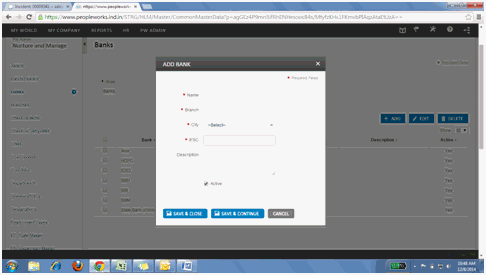
13. How can I configure bank details in PW?
Following are the steps to add bank details:
Step 1: Navigate through (PW Admin >> Nurture and manage)
Step
2: Select Banks, click on
![]() and
fill the necessary fields with the IFSC code which is unique.
and
fill the necessary fields with the IFSC code which is unique.
Step
3: Click on  .
.
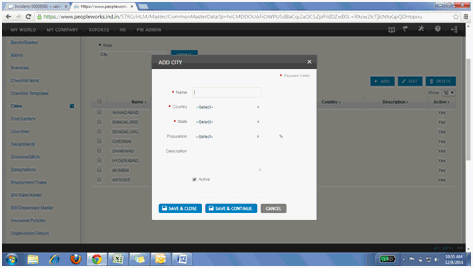
Following are the steps to add new city:
Step 1: Navigate through (PW Admin >> Nurture and manage>> See all).
Step
2: Select Cities,
click on ![]() and fill the necessary fields.
and fill the necessary fields.
Step
3: Click on  .
.
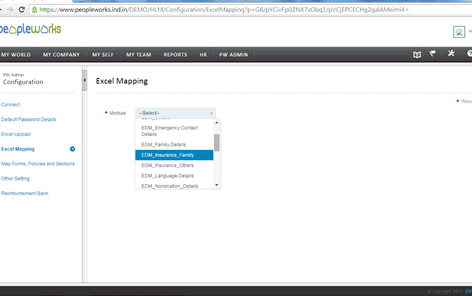
15. How can I add Insurance details in PW?
Following are the steps to upload insurance:
Step 1: Navigate through (PW Admin >> See all>> General Configuration>> Excel Mapping).
Step 2: Select EDM Insurance Family from the Module dropdown.
Step 3: Download the template.
Upload the EDM Insurance Family
After updating the downloaded Excel sheet:
Step 4: Navigate through (PW Admin >> See all>> General Configuration>>Excel Upload)
Step 5: Select EDM Insurance Family from Module dropdown and browse the updated sheet.
Step
6: Click on .
16. How can I provide assess right on PW?
Following are the steps to provide assess right on People Works:
Step 1: Navigate through (HR>> See all>> Employment Details>> Current Organization)
Step
2: Search the employee, click on  .
.
Step 3: Click on Role field and select the desired role from the dropdown.
Step
4: Click on  .
.
17. How can I create the Email Templates in PW?
Following are the steps to create email templates:
Step 1: Navigate through (PW Admin >> See all>> Email Configuration).
Step
2: Select Email Templates, click on ![]() and fill the necessary fields.
and fill the necessary fields.
Step
3: Click on  .
.